Creating a child theme in WordPress is a great way to customize your website while ensuring that your changes are preserved when the parent theme is updated. This beginner’s guide will walk you through the process step-by-step.
What is a Child Theme?
A child theme in WordPress is a theme that inherits the functionality and styling of another theme, known as the parent theme. This structure allows users to make customizations and modifications without directly altering the parent theme’s files.

Key Features of a Child Theme:
- Inheritance: A child theme uses the parent theme’s features, styles, and templates. You can add or override specific aspects of the parent theme.
- Safe Customization: Changes made in a child theme are not lost when the parent theme is updated. This makes it easier to maintain and manage your website.
- Easy Reversion: If you encounter issues with your child theme, you can easily switch back to the parent theme without losing any data or changes.
- Experimentation: You can test new styles and features without affecting the live site, allowing for a safe environment to experiment.
When to Use a Child Theme:
- When you want to customize a theme without losing changes during updates.
- When you want to add new features or styles while keeping the core functionality of the parent theme intact.
Benefits of Using a Child Theme
- Safeguard Customizations: Updates to the parent theme won’t override your changes.
- Easy Maintenance: You can easily switch back to the parent theme if needed.
- Experimentation: Test new features or styles without risking your live site.
Child themes are an essential tool for WordPress users who want to customize their sites effectively while maintaining the flexibility to update the parent theme. They provide a structured way to manage modifications and ensure a more stable website experience.
Step-by-Step Guide to Creating a WordPress Child Theme
Step 1: Set Up Your Environment
You can work with either a local or a live WordPress installation.

- Local Installation: This is ideal for development and testing. You can use tools like:
- XAMPP: A free and open-source cross-platform web server solution stack package.
- MAMP: A free, local server environment that can be installed under macOS and Windows.
- Local by Flywheel: A user-friendly local development tool.
- Live Installation: If you’re working directly on a live site, ensure that you have admin access to your WordPress dashboard.
Step 2: Create the Child Theme Directory
Creating the child theme directory is a straightforward process. Here’s how to do it step by step:
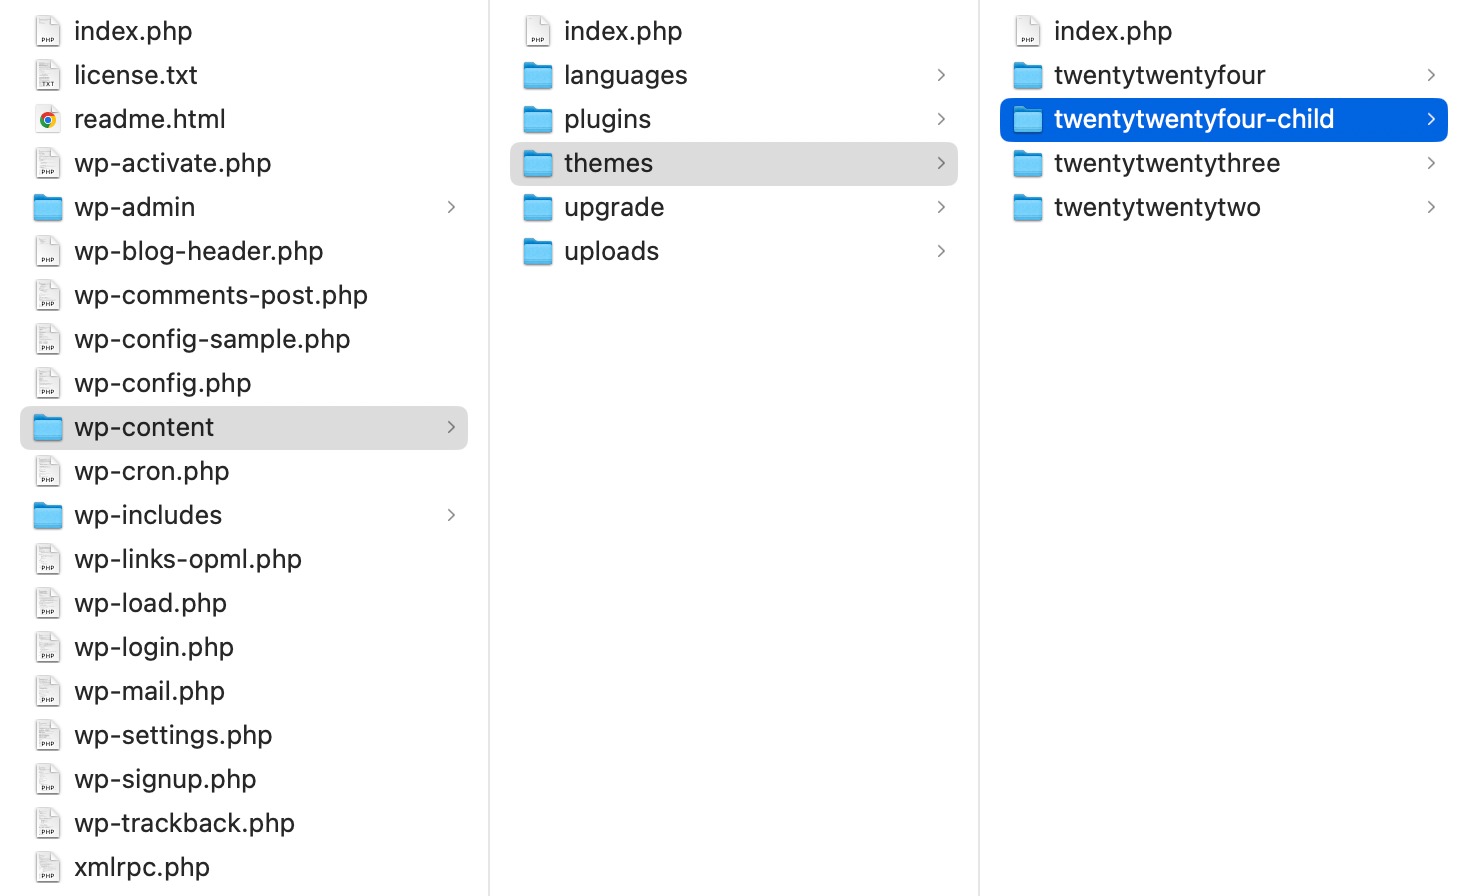
Step 1: Navigate to the Themes Directory
- Access Your WordPress Files:
- Use an FTP Client (like FileZilla) or your hosting provider’s File Manager to access your WordPress installation.
- Navigate to the
wp-content/themesdirectory. This is where all your themes are stored.
Step 2: Create a New Folder for Your Child Theme

- Create a New Folder:
- Right-click inside the
themesdirectory and select Create New Directory or New Folder. - Name the folder using a format that makes it clear it’s a child theme. A common convention is to use the parent theme’s name followed by
-child. For example:- If your parent theme is called
twentytwentyfour, name your child theme foldertwentytwentyfour-child.
- If your parent theme is called
- Right-click inside the
Step 3: Verify the Folder Creation
- Check Your Directory:
- Ensure that the new folder for your child theme appears in the
wp-content/themesdirectory. - You should see both the parent theme and your newly created child theme listed.
- Ensure that the new folder for your child theme appears in the
Step 3: Create the Style Sheet (style.css)
- Inside your child theme folder, create a file named
style.css. - Add the following code to the
style.cssfile:/* Theme Name: Your Parent Theme Child Theme URI: http://yourwebsite.com Description: A child theme of Your Parent Theme Author: Your Name Author URI: http://yourwebsite.com Template: yourparenttheme Version: 1.0 */ /* Import the parent theme styles */ @import url("../yourparenttheme/style.css");Make sure to replace
yourparentthemewith the actual directory name of your parent theme.
Step 4: Create the Functions File (functions.php)
- In the same child theme folder, create a file named
functions.php. - Add the following code to enqueue the parent theme styles:
<?php
function my_theme_enqueue_styles() {
    $parent_style = 'parent-style'; // This is 'twentytwentyfour-style' for the Twenty Twenty-Four theme.

    wp_enqueue_style($parent_style, get_template_directory_uri() . '/style.css');
    wp_enqueue_style('child-style',
        get_stylesheet_directory_uri() . '/style.css',
        array($parent_style)
    );
}
add_action('wp_enqueue_scripts', 'my_theme_enqueue_styles');
Replace
'parent-style'with the handle of the parent theme’s main stylesheet if necessary.
Step 5: Activate Your Child Theme
- Log in to your WordPress admin dashboard.
- Go to Appearance > Themes.
- You should see your child theme listed. Click Activate.
Step 6: Customize Your Child Theme
Now that your child theme is activated, you can start customizing it! You can:
- Add custom CSS to
style.css. - Create new template files (e.g.,
header.php,footer.php) to override the parent theme’s files. - Modify functionality via
functions.php.
Additional Customizations
To further enhance your child theme:
- Custom Templates: Create custom page templates by duplicating files from the parent theme and modifying them.
- JavaScript Files: If your parent theme uses JavaScript, you can enqueue additional scripts in
functions.php.
Conclusion
Creating a WordPress child theme is an essential skill for anyone looking to customize their website while maintaining the integrity of the parent theme. By following the steps outlined in this guide, you can safely make modifications, add new features, and enhance your site’s design without the risk of losing your changes during theme updates.
Using a child theme not only ensures that your customizations are preserved, but it also provides a flexible environment for experimentation and growth. Whether you’re a beginner or looking to expand your WordPress knowledge, mastering child themes will empower you to build a unique and tailored online presence.
Now that you have the tools and knowledge to create a child theme, it’s time to unleash your creativity and take your WordPress site to the next level. Happy theming!


